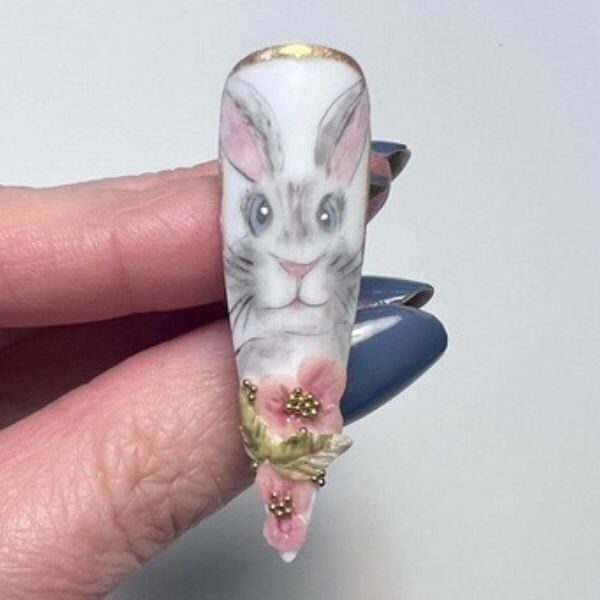
3 steps to paint an Easter bunny nail portrait

Seasonal & Occasions, Step by Step
Scratch Stars Educator of the Year 2022, Michelle Brookes, shares how to create a pretty springtime portrait of a bunny for Easter.
All products used are from Artistic Nail Design, available via www.sweetsquared.com
Step 1

Paint the nail white and lightly buff to create a matte finish. Using a pencil, lightly sketch the outline of the bunny and paint the inside of the sketch with a thin layer of Artistic Colour Bloom. Do not cure.
Step 2

Mix together Artistic Colour Gloss gel polishes in Swag and Bride to create a few different shades of grey. Using a thick detailer brush, fade the colours out and allow them to bloom. Using a finer detailer brush and dark grey shade, create tiny fur details to add dimension. Cure. Paint the inner ears with Artistic Colour Bloom, then add a pink Artistic Colour Gloss shade to achieve a watercolour effect. Cure. Using a detailer brush and pink and blue Artistic Colour Gloss shades, paint the nose and eyes. Cure.
Step 3

Using Artistic Colour Gloss in Swag, add fine lines and details to the design. Cure, then use Artistic Colour Gloss in Bride and a dotting tool to add a white dot to each of the eyes. Cure. Apply Artistic Matte Top Coat to the nail, and cleanse using Artistic Nail Surface Cleanser.
Use the Artistic Rock Hard system (White Powder) to create 3D flowers and leaves. Paint with pink and green Artistic Colour Gloss gel polishes, and add gold bullion beads in the middle of the flowers. Use Artistic Chrome Gel to paint a line near the cuticle area. Rub Artistic Chrome Pen in Gold across the line of Chrome Gel and apply Chrome Top gel across the area. Cure.

Read the latest issue


