How to ace encapsulation in L&P & gel nails
By Katie Barnes | 02 April 2019 | Expert Advice, Feature

Encapsulation, also referred to in the nail industry as ’embedding’ is the action of enclosing something in or as if in a capsule, for example in-between two layers of nail products like L&P or gel.
The possibilities of what you can encapsulate are endless; from conventional nail items such as glitter, cracked ice and confetti etc. to other items such as lace, snakeskin and more.
When looking for items to encapsulate, even though not touching the skin directly, we still need to work with safe products. This extends to any items we want to encapsulate as well as apply on top of the nail.
The quality and suitability of the item is also essential to ensure that it be effectively used with nail products. Some items have a coating that may will lose the coloured coating or be damaged when coming into contact with nail products such as monomer. When wanting to experiment with a new item, try it on a nail tip first to ensure this issue doesn’t occur when working on a client because often, it will become apparent too late.
The longer the enhancement, the easier you will find encapsulation due to the increased surface area. This is when managing client expectations comes in to play – you cannot encapsulate the same items or achieve the same effect on a gel polish overlay as you can a 20mm long extension.
The exact area in which you encapsulate particular items is important to consider and the understanding of a well-structured enhancement is necessary. You should encapsulate items, especially those that are thicker, in the thickest areas on your enhancement and avoid the thinner areas. Consider the thickest areas of your enhancement – this is usually the smile line, apex or the centre of the free edge. The areas to avoid are the cuticle zone, free edge and side walls as these are thinner and you will be forced to either leave unsightly bulk, or file through your design.
To ensure you aren’t adding unnecessary bulk to the nail and still keeping it aesthetically and structurally correct, you also need to ensure the item you are using is not too thick for the length and shape of nail you are creating. When encapsulating 3D work, ensure it is kept thin, to avoid filing through this. If you are creating a thin platform with clear or coloured product, it is essential that this is as thin as possible, just a ‘wash’ of product is necessary to provide a platform to work on. If this is too thick, you will experience the same problems as above. The thickness should be no more than that of a tip.
When encapsulating, the medium to use to adhere the item can depend upon products used, working time and preference.
Adhering with L&P
When pressing items into clear acrylic, it is important to work faster so that the product still has some flexibility to secure your item. Place the product you want to encapsulate on the acrylic and use the back of your brush or an orange wood stick to push this in, so it grips from all sides and does not move when you apply your covering layer. If you work slower, then you can apply a very, very thin layer right before you are ready to press the item in.
Adhering with gel or acrygel
Apply a very thin layer of clear gel or acrygel, no thicker than a tip – then cure for a short period. You will need to do some experimenting and trial and error to get your perfect timing for this method, as each brand/lamp is different but usually around 2-3 seconds. The perfect time is when the product is no longer fluid but is able to hold anything you press in.
Adhering with glue
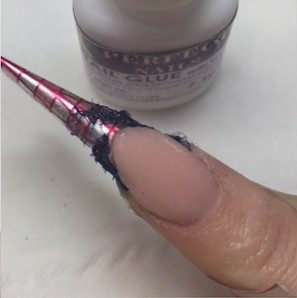
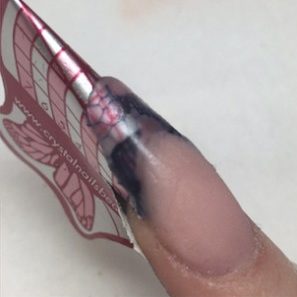
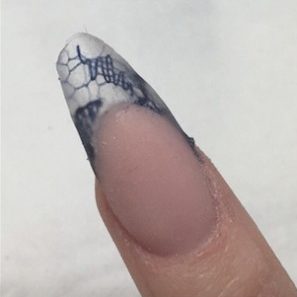
I prefer to use glue for thicker items such as lace. Apply a very thin layer of clear acrylic or gel and wait till fully cured, place some nail glue on this clear platform and then press in the item, holding in place until the glue has dried. Trim any excess and ensure nothing is overlapping the sides or free edge, otherwise it will not create the ‘capsule’ and you will have a gap in your enhancement.
When encapsulating items, including 3D work, consider how you want the finished result to come across before planning with method and system to use.
Gel will always make something look further away, with more dimension, whereas L&P will make something look flatter and closer. Gel will also give you your clearest clear finish, so if looking for a glass like finish, gel should be your choice.
See below for a step-by-step guide to encapsulating lace…
Love Katie x

Read the latest issue


